


Arduino is a popular platform for IoT product development and is commonly used for STEM/STEAM projects. All around the world, hundreds of thousands of designers, engineers, students, developers, and Makers are building with Arduino for music, games, toys, smart homes, farming, autonomous vehicles, and more. This new “connected” paradigm where digital meets physical enables anyone to create applications that are literally changing our world.
Arduino is an open-source electronics platform based on easy-to-use hardware and software. Arduino boards are able to read inputs like light on a sensor, a finger on a button, or a Twitter message – and turn it into an output – activating a motor, turning on an LED, publishing something online. You can tell your board what to do by sending a set of instructions to the microcontroller on the board. To do so you will require the Arduino programming language (based on Wiring), and the Arduino Software (IDE), based on Processing.
You can easily Buy Arduino from: Digikey
Hardware Structure of Arduino
- Microcontroller
- 14 Digital Pin (for INPUT and Output)
- 6 Analog Pins ( named as A0 – A5)
- Power Supply
- Power Jack
- USB Port
- Reset Button
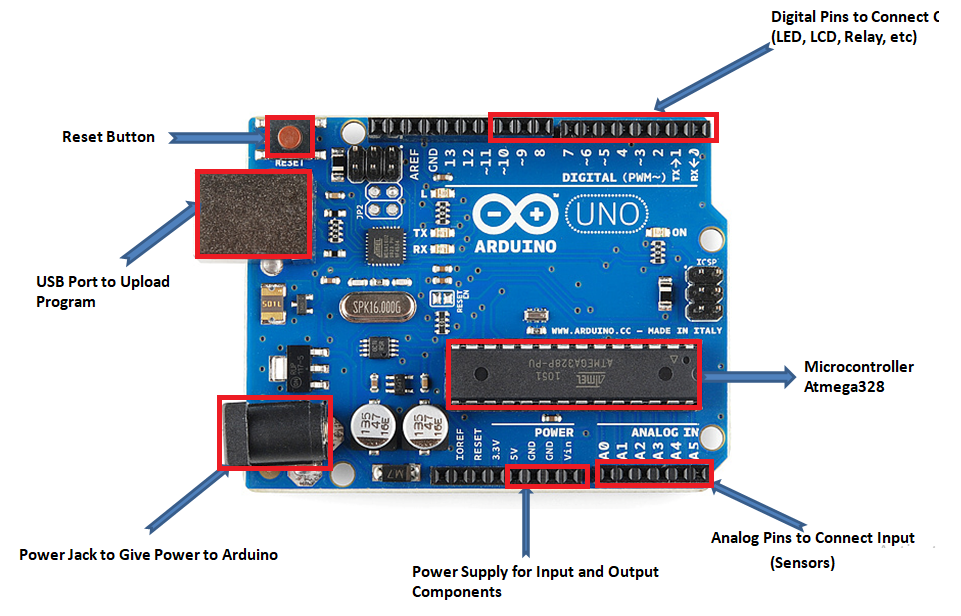
Microcontroller: Microcontroller is the main component of Arduino Uno ,The Arduino Uno board is a microcontroller based on the ATmega328.
14 Digital Pins: Arduino Uno Consist of 14 Digital Pins Where output Components like: LED, LCD, Relay etc; are connected.
Analog Pins: Arduino Uno Consist of 6 Analog Pins, Analog Pins are usually used to connect sensor like: IR Sensor , RF Sensor these all sensor have analog value that’s why they are connected to analog pins, Most of the input components are connected here.
Power Supply: The power supply pins are Vin, 5V, 3.3V, GND, IOREF are used to power Input and output components. The recommended range is 7 to 12 volts to play your board safe.
Power Jack: Arduino board can be powered either by USB connection or with an external power supply. This is used to power the Arduino board where we connect the 9 volt battery.
USB Port: This port function to programme the board or to upload the programme. The one end of USB cable is connected to the laptop and another to this port. With help of Arduino software and USB cable, one can upload the programme on the board.
Reset Button: This is used to start the programme again which is once uploaded.


