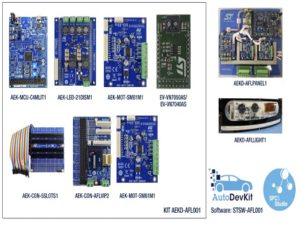
AutoDevKit is a development initiative that aims to offer fast and straightforward prototyping capabilities to teams designing key features for vehicles. From a firmware development point of view, it rests on the AutoDevKit library plugin for SPC5-STUDIO, which contains various software components to help install, setup, and use functional boards in conjunction with a microcontroller platform, thus enabling the creation of a proof-of-concept in just minutes.
The plugin automates a lot of the low-level work that takes place behind-the-scenes and shields developers from consulting a pile of documents before they can even think of running their prototype. Moreover, it provides APIs to ensure developers can rapidly and efficiently create applications with just a few lines of code. Unlike a lot of the competing solutions in this industry, AutoDevKit makes prototyping more accessible by offering a wide and heterogeneous set of functional boards, a lot of visual cues and graphical user interfaces as well as copious amounts of documentation, demo samples, and source codes to help engineers learn from our implementation.
Such an initiative is possible because ST sits at the intersection between hardware and software. AutoDevKit is that much more powerful because it uses our Automotive Evaluation Kits (AEK). An AEK Functional Board focuses on a specific feature, such as motor control, LED lighting, power management, Bluetooth communication, GNSS, and many others. They all connect to an AEK MCU Discovery Board that integrates the main host. Engineers can thus see that AutoDevKit doesn’t aim to create a reference design, which is often too rigid with very strict hardware and software constraints. Instead, it is a path to a proof-of-concept that takes hardware blocks and brings them together through the AutoDevKit plugin. We even made video tutorials to help teams get started faster.
AutoDevKit: Connector Reconfiguration for Multiple Boards Setup
Since one of the underlying aspects of AutoDevKit is its ability to bring many boards together, hardware connectivity plays a huge part. Among others, the AEK MCU Boards offer an extended 4×37 I/O connector that Provides enough pins for peripheral interfaces, thus ensuring that all our Functional Boards easily connect to the microcontroller. Our Discovery kits, like the SPC584B-DIS, still offer a traditional Arduino connector, which will undoubtedly please teams with existing boards. And although AutoDevKit also supports these boards, the AEK hugely benefits from the 4×37 pin header because it easily transcends the limits of standard interfaces by ensuring access to most of the GPIOs and signals.
We also came up with connector boards (AEK-CON) dedicated to rapidly and physically reconfiguring the pin placement in the 4×37 header, to suit different types of connectors. For instance, the AEK-CON-5SLOTS1 board can take the signal from its first or second connectors and rewire them onto its third connector with a different pin order. It’s a highly important feature because it means that its forth connector, which benefits from this reordering, can receive a functional board from a third-party or one of our AEK. The AutoDevKit plugin makes the 4×37 connector even more practical by offering, in the “Board View” tool, a diagram showing how to wire a Functional Board to the various pins of our large header. A specific table for each Functional board also shows the origin and target pins as well as the various connectors on the boards.
AutoDevKit: Pin Configuration and Reconfiguration for All Stages of Development
Another essential feature of the plugin is its ability to configure the MCU’s pinout automatically. The user simply needs to select the microcontroller present on the development board and the Functional kits connected. The system then automatically sets up the clock tree, pins, drivers, and generates a project to allow developers to start working on their application immediately. Additionally, when teams desire to optimize their design by selecting a different microcontroller that best suits their cost and performance requirements, AutoDevKit enables them to swap MCU at any stage of development. Thanks to its dynamic pin allocation and configuration, developers do not need rewrite their code.
Traditionally, it can take several months for multiple development boards to talk to each other if a team starts from scratch. It can also be a frustrating endeavor to figure out whether something isn’t working because of a software bug or a hardware issue. By providing AEK boards and AutoDevKit, we remove a lot of the complexity so engineers can focus on the features they want to promote with their proof-of-concept rather than figuring out an ephemeral design.
AutoDevKit in Action to Build Proofs-of-Concept in Minutes
We have a few sets that showcase the power behind AutoDevKit. One of them is the AEKD-BLINDSPOTB1, which demonstrates how to simulate a blind spot detector and warning, common in modern vehicles. It uses magnets instead of the traditional radar, but as the video below shows, teams could create a proof-of-concept in a few hours at most. Once teams set up all the boards, it’s possible to write the entire application in the main function with fewer than 50 lines of code. Thanks to the AutoDevKit APIs, developers can quickly take advantage of the many features of the AEK boards with very little code. The APIs handle a lot of the work that takes place behind the scenes. In the example of the blind spot statement, the loop containing the running application only requires two conditional statements and an averaging function to clean up the signal.
AutoDevKit offers a development paradigm that is so straightforward, we ran certain projects with university students and realized they were grasping all of its fundamental concepts in only a few hours. We also offer other demonstration sets, such as the Adaptive Front Lighting Solution we introduced at the end of 2019 or the AEKD-USBTYPEC1. The latter uses two Functional Boards, the AEK-POW-L5964V1 for the power management, and the AEK-USB-2TYPEC1 for the USB ports, so teams can rapidly come up with an automotive-grade dual USB Type-C port system with Power Delivery charging at up to 60 W. Additionally, these prototypes serve as a strong foundation. Since we give out source code, schematics, and Gerber files, engineers don’t have to start from scratch. They get to use our implementations and customize them for their needs, optimizing their PCBs and applications for their particular use case.
The blog has been first published in ST Blog.


