

PART 2: CHOOSING A FRAME FOR YOUR DRONE
On your quest to learn how to build a drone, it’s imperative that you memorize the above terms. At the very least, you should have them written down for quick reference. In this part of the guide, you’re going to learn about the different types of frames that you can use to build a drone. Below, we’re going to cover all of the most basic/common frame configurations that exist, as well as show you the different types of materials that they can be made from. Like before, make sure that you take notes because the following information is very important!
TYPES OF RC DRONES/FRAME SETUPS
Not only am I going to show you the most common types of frame setups, but I’ll also discuss the pros, cons, and characteristics of each one. With that being said, let’s get started.
FRAME TYPE #1: QUADCOPTER
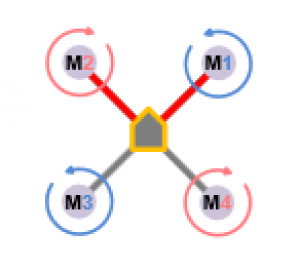 This is by far the most common type of frames that you see within the RC drone industry. It has four arms, each of which are connected to a single motor. In the illustration to the left, you’ll notice that the quadcopter is designed in an “x configuration”. Just remember that “+ configuration” quadcopter frame setups also exist. When learning how to build a drone for the first time, I highly recommend that you use a quadcopter frame. Not only is it the simplest type of frame design you’ll find, but it’s also one of the most versatile. This is why popular drone models like the DJI Phantom 3 and the Parrot Bebop are all built using this exact frame configuration.
Pros: One of the biggest benefit to using a quadcopter frame is that nearly all of the flight controllers (you’ll learn about those later) on the market today can work with this type of design. It’s also one of the simplest designs you can use, which is perfect if you’re learning how to build a drone for the first time.
Cons: No frame design is perfect – not even the quadcopter. A drawback to using this frame type is that if one motor or propeller fails, the remaining motors/propellers won’t be able to compensate, resulting in a crash. For this reason, if you’re going to use a quadcopter frame, you need to do it the RIGHT way!
FRAME TYPE #2: TRIPCOPTER
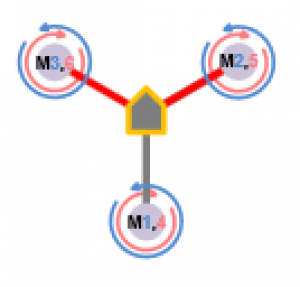 This type of frame isn’t as common as quadcopter frames, but it’s certainly an option for anyone interesting in learning how to build a drone. This type of RC drone design has three arms, each of which are connected to a single motor. With this type of setup, the UAV will have three arms that are separated by approximately 120 degrees each. Since this design isn’t symmetric, the lone rear motor (as you can see from the illustration in the left) must have the ability to rotate using a normal RC servo motor (will be discussed later) so that it can counteract the fact that there are an uneven number of rotors. As with the quadcopter setup, there are benefits and drawbacks to the tricopter setup.
Pros: If you’re looking for something that’s “different” from an aesthetic standpoint, then a tricopter setup is the way to go. When in motion, this type of frame setup flies more like an airplane than it does an RC drone. Also, since it requires the fewer number of brushless motors, it could be the cheapest route to take when learning how to build a drone.
Cons: Due to the fact that this design requires an RC servo motor to rotate the rear motor (since the copter isn’t symmetric), the overall building process is, in theory, much more complicated. While we won’t get into much detail, let’s just say that the rear arm requires a lot of complex work done to make it operate efficiently.
FRAME TYPE #3: HEXACOPTER
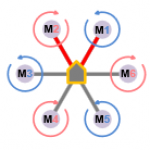 As its prefix implies, a hexacopter (“hexa” = six) is a type of drone setup in which there are six arms. Each arm is connected to a single motor. Generally speaking, these types of setups are reserved for flyers who are interested in doing some serious aerial photography. They can exist in one of two different “layouts”: one in which the front of the body is located between two motors, and one in which the front of the body is located directly behind a single motor. I’ve never built a hexacopter before, but I thought that I’d include it on this list anyway just so that you can see what your potential options are when learning how to build a drone. Now, let’s go over the pros and cons of this frame setup.
Pros: One of the main benefits to a hexacopter frame is that you’ll be able to deliver more thrust. This comes in handy for lifting heavier payloads. Also, if one motor fails, then there’s still a chance that the drone can land safely rather than crashing. Another great advantage to this design is that nearly all flight controllers support this type of frame setup.
Cons: In general, building a hexacopter is going to be more expensive than building say, a triocpoter or quadcopter. This is due to the larger number of parts required to make it fly. Also keep in mind that more parts equals more weight, so in order to achieve the type of thrust you’ll need to get a hexacopter in the air, a larger battery will be required.
FRAME TYPE #4: OCTOCOPTER
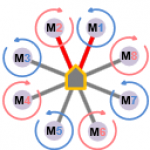 Last but certainly not least on this list is the octocopter. With this frame setup, there are eight arms, each of which are connected to a single motor. As you can imagine, there’s a huge amount of thrust being produced with this type of setup. But as the old saying goes, “With great power, comes great responsibility“. If you decide to go with this type of frame setup, which I don’t recommend if you’re a beginner, then you have a long, challenging road of ahead of you. For the most part, these types of RC drone setups are reserved for people who know what they’re doing. When learning how to build a drone for the first time, stick to a simpler model, like the quadcopter or tricopter setup.
Pros: The high amount of motors present means more thrust, which subsequently means it can lift heavier things. Another great advantage to this type of design is that if one motor fails, the drone can probably still make it to the ground safely rather than crashing.
Cons: As you’ve probably guessed, more motors equals a more expensive build, as well as a larger battery pack. For the most part, people who build larger octocopters are interested in serious aerial photography and/or videography. I’m not saying that it would be impossible for a beginner though.
COMMON TYPES OF MATERIALS USED FOR DRONE FRAMES
Now that you’ve familiarized yourself with the different types of frame setups, let’s go over the most common types of materials that can be used when learning how to build a drone frame. While this list does not contain every possible material which can be used in your DIY project, it does include the more popular/budget-friendly ones. With that being said, let’s see what they are!
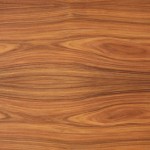 WOOD: If you’re trying to build a drone as cheaply as possible, then consider using a wooden frame. Wood isn’t the most aesthetically appealing option out there, but it’s certainly one of the most inexpensive. One reason why I love wooden frames is because if something breaks, you can quickly and easily replace it. If you’re going to use wood for your drone’s frame, then make sure that it doesn’t have any areas that are warped or twisted.
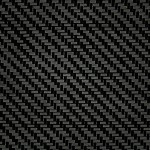 CARBON FIBER: If you can afford it, I would highly recommend building your frame out of carbon fiber. The reason why is simple: carbon fiber is very tough and extremely lightweight. It’s this combination that will make your RC drone fly better and consume less energy. Remember that carbon fiber impedes RF signals (you’ll learn about these later), so make sure that you keep this in mind when you’re mounting important electronic components (like an antenna for example).
 PCB: Also known as “Printed Circuit Board”, this is a type of material that shares the same basic structure and properties as fiberglass. Unlike fiberglass, PCD is always flat. Frames that are less than 600mm in size typically use PCB for the bottom and top plates. In fact, small quadcopter frames can be built entirely from a single printed circuit board. Click here to learn more about printed circuit boards and how they work.
 PLASTIC: Most commercial RC drones that you buy today come with plastic frames. 3D printed molded plastic frames have become an incredibly popular amongst DIY drone enthusiasts. Generally, using a 3D printer to create a perfectly shaped plastic frame is something that only works on smaller drones. When using plastic sheets (not 3D printed shapes or objects), you can strategically use them on your landing gear or for the cover of your drone.
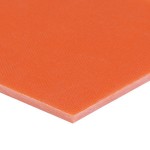 G10: G10 is a variation of fiberglass that’s often used as a less expensive alternative to carbon fiber. From the outside, G10 and carbon fiber look almost identical, but they do vary slightly in their basic properties. You can purchase G10 in sheet format. As far as pricing is concerned, it costs less than carbon fiber but is still more expensive than wood, aluminum, or plastic. Here’s a really useful forum post I found on the major differences between G10 and regular fiberglass.
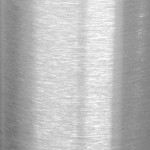 ALUMINUM: Aluminum can also be used when building your frame. It’s lightweight (though not as lightweight as carbon fiber), flexible, and is relatively easy to work with. You can use aluminum to build the entire frame, or simply use the material to supplement certain parts of the frame (arms, landing gear, etc.). Another benefit to aluminum frames is that this type of material is both inexpensive as well as readily accessible.
HOW BIG DO YOU WANT YOUR DRONE TO BE?
When learning how to build a drone, you need to become familiar with the standard sizes that are out there. For example, some RC drones can fit in the palm of your hand – these are called “nano” drones. Larger ones, like “mega” drones, are extremely large, and often must be transported in the backs of trucks. In either case, understanding what size you want your drone to be is very important. As a beginner, I’m going to recommend a size range of 400mm to 500mm. This size range will provide you with A) A lot of value, and B) A lot of versatility.
ARE SMALLER DRONES LESS EXPENSIVE TO BUILD THAN LARGE ONES?
Not necessarily. As you’ll come to see when learning how to build a drone, the total cost relies more on how advanced your flight controller is, whether or not you’re going to mount a camera, etc. Generally, the frame will be the least expensive part of your build, but this doesn’t mean that it’s the least important.
Source: beginnerflyer.com


